Authors: Neetu Singh Kushwah, Shallu Thakur, Alok Das, N P Singh
Indian Institute of Pulses Research (IIPR), Kanpur
Thermal asymmetric interlaced (TAIL) PCR is a very popular technique to amplify the unknown DNA fragments adjacent to known sequence. It was first reported by Liu and Whittier (1995) in Arabidopsis thaliana.
How it works
It requires a set of nested sequence specific primers (TR1, TR2, TR3) along with short arbitrary degenerate (AD) primers (ADn1-ADn6) of 15- or 16-mers of low melting temperature with various level of degeneracy (64 to 256 fold). By alternating the annealing temperature at high (62°C to 68°C) to low (44°C), the relative amplification efficiencies of specific and nonspecific products can be thermally controlled.
How to design sequence specific primers for TAIL-PCR
The T-DNA specific primers have to be designed as close as possible to the right/left border repeat sequence but should not be exactly from the border sequences as T-DNA integration is not precise and always leads to some rearrangement or deletion of the borders. Further, distance between second (TR2) and third (TR3) nested primers should be kept in such a way so that they facilitate the identification of target product by size comparison. Designing of TAIL-PCR primers is illustrated in the Fig. 1.

Fig. 1 Hypothetical example of designing of TAIL-PCR primers
One more thing should be considered while designing primers. There is some of the T-DNA sequence which showed homology with the plant genome. Hence, primers must be checked with NCBI-primer BLAST program for any possible homology with the plant genome you are working for. Availability of draft genome of the plant species will help identifying the genomic region.
How to setup TAIL-PCR reaction
TAIL-PCR reactions have to be kept in a sequential order of primary, secondary and tertiary in which product of one reaction is used as template for next reaction. Primary reaction has to be kept in six reaction tubes carrying genomic DNA, known sequence specific primers and different degenerate primers. Primary PCR product used as template for the secondary reactions which contain similar component except for the substitution of TR1 primer with the TR2 primer. Tertiary reaction uses the PCR product of secondary reaction as template and third nested primer (TR3) with the same six AD primers as used in primary and secondary reactions. In this way, TAIL-PCR requires 18 PCR reactions for the identification of single event.
How to analyze the TAIL-PCR amplified product
All three nested PCR products of TAIL-PCR are run alongside in agarose gel electrophoresis. Size difference between secondary and tertiary PCR products may give the indication that product is to be insertion specific (Fig 2). Putative insertion specific bands from secondary reaction are eluted from the gel and should be cloned into the pGEMT-easy vector for sequencing. Cloning in pGEMT-easy vector is recommended because obtaining a single putative insertion specific band in TAIL-PCR takes around 2-3 days and if the sequencing reaction is failed, one can immediately use the cloned sequence for sequencing template preparation without undergoing cumbersome three round of TAIL-PCR, gel electrophoresis and gel elution.
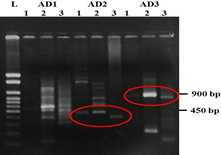
Fig. 2 Gel photograph of TAIL-PCR product. Number 1, 2, 3 indicates primary, secondary and tertiary TAIL-PCR reaction using different AD primers. Circle indicates putative T-DNA insertion specific band.
How to analyze the TAIL-PCR sequencing results
Sequence file is first processed to remove any cloning vector sequence and then aligned with the T-DNA sequence from where TAIL-PCR primers have been designed including border and backbone sequences. Several kinds of results will be obtained in this alignment.
1. Sequence contains secondary and tertiary TAIL-PCR primers and rearranged right or left border sequences or complete deletion of border sequence. Hence, it is suggested that never design TAIL-PCR primers exactly from the border sequences.
2. Sequence contain only secondary TAIL-PCR primer sequence
3. T-DNA sequence including secondary and tertiary TAIL-PCR primers, intact border and backbone sequence
After identification of T-DNA sequence in the TAIL-PCR amplified product, remaining sequence is subject to NCBI-BLAST to find out the site of T-DNA insertion. If sequence shows hit with any of the genomic region then it could be considered as putative flanking gene. If we examined the sequence closely, some unique features of T-DNA insertion will appear. This is illustrated with one example. In this sequence, T-DNA sequences are shown in pink and genomic sequence is highlighted with green. At the junction between T-DNA and genomic sequence, 14 bp flanking gene sequences has been duplicated during integration of T-DNA into the genome.
GAAGTTCATTTCATCTGGAGAGAACACGGGGGACTCTAGAGGATCCAGGCCTTT
TGAATGACACAATATGAATGACACAATA
AACTTTTTAGCGCAGTGGTACATATAACATTTTGAATCTTACCAAAATGGGAGTTTTAAATACTTTTTTTT
GAAACTTTTGTTTCTTTTTCTAATTTGGTTGTGATATTTAATATTAGCAACAT
After identification of flanking gene through BLAST analysis, there is need for confirmation of predicted sequence through PCR. This could be done by using primers from the flanking gene and T-DNA primers as illustrated in Fig. 3.
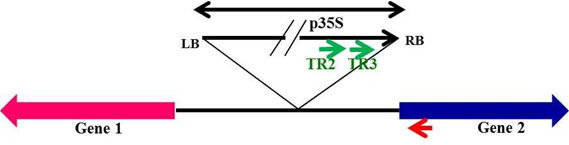
Fig. 3 Designing of primers from the flanking gene for confirmation of T-DNA insertion
If PCR amplified product gives expected size band then it is said to be that identified T-DNA insert location is confirmed.
References:
1. Liu, Y. G. and Whittier, R. F. (1995) Thermal Asymmetric interlaced PCR: automatable amplification and sequencing of insert end fragments from P1 and YAC clones for chromosome walking. Genomics, 25(3):674-81.
About Author / Additional Info:
Author has expertise in cloning of genomic DNA sequence flanking the T-DNA, presently working on development of pod borer resistant transgenic pigeon pea and chickpea